The Anatomy of an Action
In this tutorial I am going to introduce you to the wonderful world of Actions. What are they, why you use them and how they will change the way you think about Photoshop and the process in which you work. So let's start off by looking at what an action is.
An action quite simply is a series of steps in Photoshop that you record and save in sets for later use on other images, or on a whole folder of images using the File -> Automate -> Batch Process command. They can be thought of as macros or scripts, if you are a programmer, or the best thing since sliced bread if you are a Marketing slave that is under the production gun of your boss.
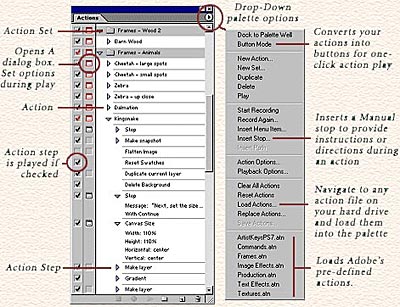
Let's have a look. Here we have the typical Actions palette with some action sets that contain the actions, and these actions contain our steps, which are the building blocks of the action itself.
To record an action, you would follow these steps:
Step 1
Open an image on which you will record the action steps. This is necessary before proceeding if you are creating an action that performs certain steps on an image, because you can't do anything in Photoshop unless you have an image open. Sometimes I will open up a dummy image in order to specifically create an action. The one exception to this rule is if you want to record an action that starts off by making a new document, you can start off with a blank Photoshop screen.
Step 2
Create a new set of Actions by clicking on the folder icon at the bottom of the palette. You can record an action inside one of Photoshop's default action sets, but what's the fun in that. Also, you will find yourself better organized if you keep all your personal actions in your own custom sets. As a rule of thumb I will create action sets based on the work I'm doing. I will make a "Production" set for any production tasks such as changing an image size, or rotating images (something that all digital photographers eventually need to do). And then I have another set of "Photo Correction" actions that contain specific actions such as "Sharpening a Photo" and "Correcting a Color Cast". You get the idea. For now, create your own new action set and provide a name for the set when the dialog comes up.
Step 3
Click on the New Action icon (the turning page at the bottom of the palette). This will open a dialog where you enter the name of the action, assign it a keyboard shortcut key, as well as a color. Colors are useful when you are in Button Mode (discussed a little later). Give your new action a name, assign it a keyboard shortcut (for practice), and then assign it a new color.
Step 4
Next, perform a series of steps in photoshop to simulate what you want your action to do. Notice that the "record" button is turned on (red circle at the bottom of the palette). This is to indicate that the action is recording the steps you are performing in photoshop. Start off with something simple, like sharpening a photo and then resizing it. Once you are finished recording your action, press the "stop" button located at the bottom of the palette (a black square).
Step 5
To play an action, you must first highlight the action name (making sure it turns blue). The action is identified as the first indented arrow beneath the folder or action set. Then click the play button at the bottom of the palette (the arrow pointing right). Photoshop will then run through all the steps in the action (the arrows in the next indented line within the action palette) unless you have unchecked any of the boxes next to any of the steps within the action; in which case Photoshop will skip over your step(s).
Next, let's take a look at the action itself. Refer back to the first image in this tutorial. Notice on the left side of your action there are two columns? The first column contains a series of checkmarks, and the second contains tiny dialog boxes. Let's explain those here:
Checkmarks: These can be turned on and off and are used to toggle steps inside the action. If they are checked, the step will be played when the action is run. If they are unchecked, the action will skip over these steps when the action is played. This provides for greater flexibility when you use an action. For instance, let's say you create an action that does two things: sharpen the image, and then resize it. Now let's say you have a photo that is already sharp enough, but it still needs to be resized. Easy enough. Just uncheck the Sharpening step in your action, and run the action over the image. Photoshop will disregard this step. Of course, the more complex your actions become, the more difficult it becomes to figure out what should be unchecked or not because actions are linear things, and sometimes a step in an action relies on another step being performed prior. So before you go out and try to produce the Uber Action of a lifetime, keep this concept in mind: ACTIONS ARE LINEAR THINGS! They rely on prior steps, and unchecking can sometimes cause an action to halt. However, you can always go back (using the History palette), check the steps again, and rerun the action. So don't be afraid to experiment.
Dialog Boxes: This one had me stumped when I was a newbie, and I had one of those "D'OH!" reactions when I realized what the next column on the left was all about. Now I use them all the time. These are your dialog boxes where you can change parameters while the actions are being run. ANYTHING that has a dialog box in Photoshop which demands specific parameters be set by the user can be incorporated into an action, and either turned on or turned off. What this means is the following: when you set up an action that sharpens your image, you will be using the Filter -> Sharpen -> Unsharp Mask filter, and this filter has a dialog box associated to it, where you provide settings for how much the image is to be sharpened. When your action is recorded, the parameters you enter into this box also get recorded with the action. By turning this box on in the action, the next time the action is run, it will stop when this dialog box is reached, the dialog will then be displayed, and the user can enter the settings they want to have.
For example, if I have a series of images that need to have different sharpening settings applied to them, this isn't a problem. Simply turn on the little dialog box, and when the action is run on all the images it will stop at the dialog each time, allowing me to enter different settings for each image. If I have the dialog box turned off, the same settings will be applied to every image. This is why you only see this choice in the actions palette next to steps that have dialog boxes only.
The following diagram will illustrate.
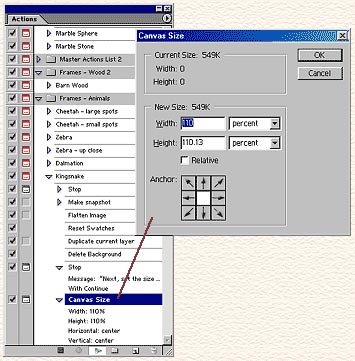
Notice that when the action is run, and the Canvas Size step is reached, the dialog box for Canvas Size is opened. The action will only continue once OK is pressed in this dialog box.
Another great use for actions is to save you time. Adobe allows you to assign the F-Keys on your computer to actions, so that you can simply hit the key and the entire action is run. So, for example, you could have an action that sets up a specific view in Photoshop where only certain palettes were open, or you can set up an action to run the Unsharp Mask filter (one of the most common filters you will ever use). This is a quick production shortcut that will save you major amounts of time. The best way to figure out what type of production actions you should create is by working in Photoshop over a period of one week. At the end of the week take a look at the tasks you most commonly perform. Then create a series of actions to automate those tasks, and assign them a shortcut key, and keep a sticky note on your desk that tells you which shortcut keys perform the actions. In no time you will remember the keys and you will be saving yourself a lot of time and headaches.
Let's talk for a second about some of the other aspects of the Actions palette.
Button Mode: This will convert your Action palette into a list of usable buttons. It looks something like this:
Here is where the color coding comes in handy. You can separate all your actions out by their color. This is where Adobe decided to make life easier for the designer, as it is much more visual than working in the default action mode. However, while it makes life easier visually, it's not very functional, as you cannot edit or change your actions while in button mode. So from a programmer's standpoint, it's not very versatile. I prefer staying in the standard action mode. This way you can work inside your actions, play them, or edit them as you like.
Stops: Inserting a Stop allows you to give directions and information to the user of your actions. They display as messages when the action is run and a stop is encountered.
The options you have in the Stop are very simple. Enter the text you want displayed in your message, and when the action is run and the stop is encountered, the message is displayed. If you check the "Allow Continue" box, the user has the option of continuing the action. If this box is not checked, the only option the user is left with is "Stop". Obviously it's not usually good practice to leave this box unchecked. Try to always give your user the "Continue" option. The only exception to this rule would be at the end of your action if you want your copyright information displayed, or during an action if you require the user to stop and do something outside the action's limits (for example performing a painting step, which the action can't record). Otherwise I would always provide the user the option of Continuing the action.
Here is what your message will look like when the action encounters the Stop. Stops are great for explaining steps, and giving your user guidance, or for remembering what you did when you created the action. They are especially useful if you are sharing actions among other people. They are the equivalent to comments that you would find in any programming code.
A word of advice about Stops: Use them sparingly. Most people are not going to like it if they have to keep clicking after every step. However, it is nice to receive some explanation about your action. I usually put a stop at the beginning of each action to let the user know what the action does, and at the end to provide my contact/copyright information. And lastly, if there are any steps I want the user to perform I will place an action stop right before... letting the user know what I would like them to do.
Saving and Loading Actions: If you click on the drop down arrow at the top right side of the actions palette you will notice there is a "Save Action" command. You can save any set of actions you create. And you can only save the entire set. Highlight the specific set you want to save, and then click on this command. It doesn't matter where you save the action set on your hard drive. I usually keep a folder where all my action sets are stored, so that I always know where they are at. A word about saving: If you have created an action or several actions and close photoshop, they will still be available when you restart. However, if Photoshop crashes at any point, the actions are lost. So a word of warning (and believe me, I have crashed Photoshop before): SAVE YOUR ACTIONS! I tend to save the action set each time I create a new one. It's a good habit to get into... not just for actions, but for any other Photoshop add-on you are creating.
To load a set of actions, click on the "Load Actions" command found under the drop-down menu as well. Then navigate to the action file you want opened. There is no limit to the amount of actions you can load into the palette, however loading too much of anything into Photoshop is probably not good practice. I would keep the action sets down to 10 sets or less, depending on how many actions are contained within the sets. Though it's never happened to me personally, I've heard some stories about things going buggy in Photoshop when too many fonts or styles were loaded. Try keeping it down to 100 actions or less. That would be my rule of thumb.
What is an Action?
Lastly, let's talk a little about what an action is. Because it's interesting to note how simple it is. An action is just a plain old text file. And you can even save actions as a text file for word. To do this, hold down Ctrl + Alt, then click on the drop down arrow at the top right of the actions palette (be sure to hold down your mouse and keep it held down as you navigate). Let go of your mouse when you reach the "Save Actions" command). The "Save As" dialog box will open. Notice that the file is saved with the .TXT extension. Normally, an action file has the .ATN extension. A word of caution though, the text file will not only save the action set, it will save the entire contents of the Actions palette in one single text file. So be sure to unload any action sets you DON'T want before you save the text file.
The gist of how an action works is this: when you play the action, Photoshop reads through the action text and performs the commands in a linear fashion. That's all there is to it. Simple huh?
Adobe comes with a few action sets already installed on your PC, and you can find them within the drop-down menu at the bottom. This is so that new Photoshop users can get comfortable using actions, and you can find some interesting ones to play around with. Or you can take a look at some of the actions I have for sale in my Catalog.