Chrome Text Effect
This tutorial came out of a member request on my forum. They wanted to know how to produce a chrome text effect that was authentic. So here is a quick way to create the effect using just a few layers, two channels, and a curve adjustment layer. The beauty of this design is that it is highly customizable even after it is created. So let's get started.
Step 1
First, open up a new document that is 800 x 500 pixels with a black background. This will give you room to enter the text.
Step 2
Next, select a big thick font that is 125 pixels in size, and enter your text using White for the font color. Here I used "Stencil Std", which is a nice big font with plenty of room to work in a nice chrome effect.
Step 3
Rasterize your font by going into Layer -> Rasterize -> Type. This turns your type into pixels that we can work with, instead of leaving your type as a type layer.
Step 4
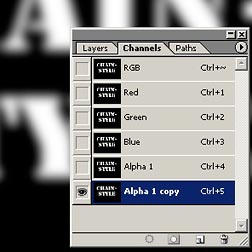
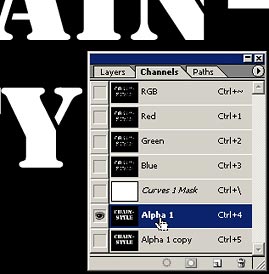
Next, create a selection of your font, by Ctrl/Command+clicking on the Layer name in the Layers palette, then go into the Channels palette and click on the little icon at the bottom of the palette which "Saves your selection as a Channel"
Step 5
This creates a Channel from your text. Next, select this new Channel, and click on the drop-down arrow in the top right corner of your Channels palette and select "Duplicate Channel" to make a copy of the text channel. You'll end up with Alpha 1 and Alpha 1 Copy.
Step 6
Deselect the text if it's still selected by going into Select -> Deselect. Then go into Filter -> Blur -> Gaussian Blur and use a Radius of 6. This blurs the Alpha 1 Copy Channel.
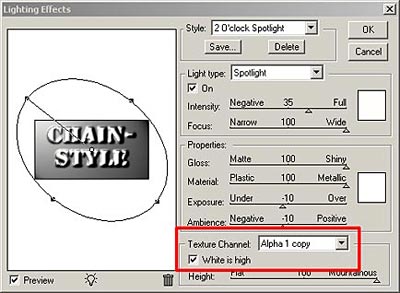
Step 7
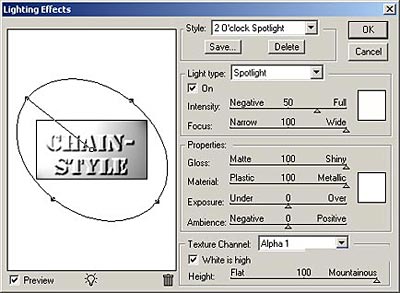
Next, go back to the text layer. Then go into Filter -> Render -> Lighting Effects and enter the settings shown below. Pay special attention to the Texture Channel. You want to use the Alpha 1 Copy (Blurred Copy) for your Lighting Effect.
Step 8
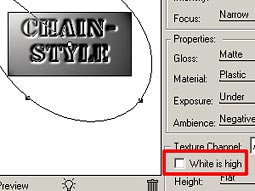
Once again, go back into the Filter -> Render -> Lighting Effects dialog and enter the exact same settings, only this time reverse the White is High option by unchecking it.
Step 9
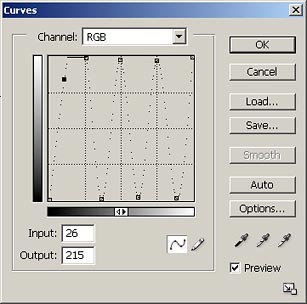
Next, add a Curves Adjustment layer above the text layer (just click on the Layer Effects button at the bottom of the Layers Palette and select Curves). Enter a curve similar to what you see here:
Step 10
Next, go back to the two channels in the Channels palette, and select the original text channel. To create a selection from this channel, Ctrl/Command+click on the Channel name.
Step 11
After you have the layer selected, go into the layers palette and create a new layer above the Curves adjustment layer (at the top of the layer stack).
Step 12
Now go into Select -> Modify -> Border and enter between 4-8 pixels. This creates a fairly thick border selection around the edge of the original text.

Step 13
Next, go into Edit -> Fill and use white as your fill color. Your new layer now has a white border around the edge of the text. After you've done this, go into Select -> Deselect to remove the selection.

Step 14
Now go back into the Filter -> Render -> Lighting Effects dialog and enter the settings shown below. This time, use the Alpha 1 (Original non-blurred text channel) as your Texture Channel.
You now have a basic Chrome text effect.

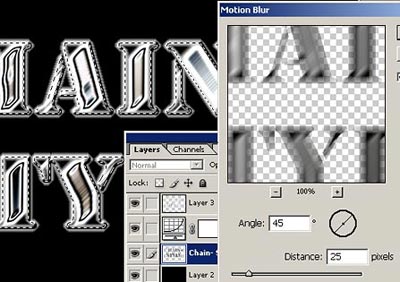
If this is too dark for you, go back into the original text layer, and then create a selection out of the layer by Ctrl/Command+clicking on the Layer name. Then go into Filter -> Blur -> Motion blur and enter a 45 degree angle with a distance between 15 and 40. You'll have to play with this setting to see what effect you are shooting for.
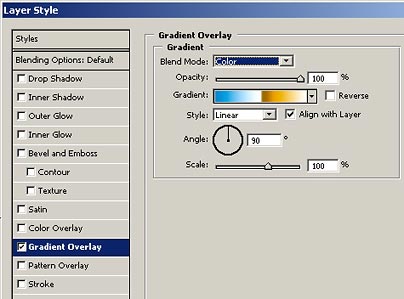
The great thing about this effect is that you can modify it in a number of ways. For instance, if you want to add a little more color into your chrome, go to the topmost layer (the text border layer) add a Layer Style with a Gradient Fill (using the default Photoshop Chrome gradient of course) and set the Gradient Fill Mode to "Color". This adds a little more color to the Chrome reflections within the text as shown below:

Try experimenting with these layers to come up with some of your own Type effects. With just a few layers and Channels, you can produce a wide variety of effects.
Until next time, you can visit me in the Forum, or drop me an Email to tell me what you think. Good luck in your Photoshop projects.