From Color to Black & White
Grayscale or Black & White photographs are one of the easiest things to produce in Photoshop. . . well, almost. While you can turn a color image into grayscale, it's good to know a little bit more. Such as how to correct for tonal variations, and get the most out of your image. And as I'm sure there could be whole books written just on this one subject, I'll try and condense it into something that is not too overwhelming.
In addition, while not strictly a filter, grayscaling your image acts like a filter in Photoshop by filtering out the color. Also, since the majority of digital cameras have a Black & White image capture setting or mode, it deserves a little bit of discussion.
First off, no matter how good your digital camera is, the Black & White mode is not, in my opinion, worth it. It makes much more sense to shoot the photograph in color and then turn it into a grayscale image in Photoshop. Why? Because you have greater control over all aspects of tone when you are converting it within Photoshop, whereas on the digital camera you have lost the ability to control it. You can set it for Black & White, and then poof! You take the picture and to be blunt, you can't do much with Black & White in the digital world. Second, If you shoot in color, you can manipulate any or all 3 color channels first, before switching into your grayscale mode in Photoshop, which, to my eye always gives a richer tone. Not to mention you will end up with BOTH the color AND the grayscale copy of the image. With the Digital Black & White you only have Black & White. And believe me when I tell you it is incredibly difficult going from grayscale to color in any software application. And whatever your final result actually is, it will never resemble what you could have shot, had you just taken your picture in color.
Of course this is a rule of thumb, and rules are generally made to be broken. If you have purchased any Black & White filters for your camera (such as a Red or Yellow filter), then experiment with them using the digital Grayscale setting. And try a few tests for yourself. Take the shot both in Grayscale and color and see which one is better. In addition, all cameras are different and handle pixels in a different manner, so perhaps there is a camera out there that has an extremely good handling of Black & White photography. I'm just saying that as a general rule I don't normally use that setting for myself, unless it is for a specific purpose (incidentally I have a red 25 Tiffen filter and it does a very nice job of handling the Black & White digital setting on my camera -- I get very nice tones within the image).
One other note worth mentioning is the Opaque filters that you can use for Infrared photography. I have heard that these work very well on Digital Cameras and is an easy alternative to traditional infrared film in order to produce a highly contrasted infrared photograph.
So with that being said, stick with color mode on your digital camera at all times, and use Photoshop to create the grayscale versions of your images. It is both better in quality and much more versatile. Below are a few techniques you can use when going from color to grayscale.
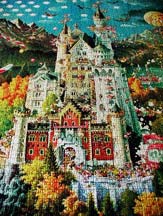
Begin with the color image you want to convert into a grayscale.
Step 1
For the first method, we will start with a straight conversion into Grayscale. Go into Image - Mode - Grayscale. A dialog box will open asking if you want to discard all the color information. Click OK. A note to keep in mind when doing this. If you want to keep a color copy of your image, go into Image - Duplicate. Then save the duplicated image as a color file on your computer. In this way you have two separate files stored: one color, and one grayscale. Once the color is removed from the photo, you cannot regain it unless you delete the state from the History palette. And when you perform more than the default 20 tasks in Photoshop, you will lose even the history state and never get your color back. So be sure to maintain an original copy. This is a good tip, no matter what you are doing in Photoshop. Always keep an original copy of your image as a separate file. I can't stress that enough. At this point you can save the image and you have a simple Black and White conversion.

Step 2
That could be good enough if your image has a great depth of tone and detail. However, another method that gives you more control is to use the Channel Mixer dialog. Go into Image - Adjustments - Channel Mixer. From the dialog, check the Monochrome box. This has the same result as converting the image to Grayscale mode, with one exception. After you make the image monochromatic, you can selectively adjust the level of Red, Green, and Blue within the image. This may not seem logical at first, because you are working with a black and white image (so why are you correcting red, green, and blue in a black and white image right?). The answer is that the color information is retained. If you look at the Channels palette, you will notice you still have the Red, Green, and Blue channels available. What you are doing is varying the degree of each channel within a grayscale environment. So you have the ultimate in flexibility.
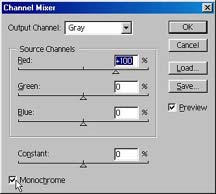
This is definitely a better method. I urge you to experiment with the various sliders in the Channel Mixer dialog, until you have an image that you like. Then, once you have finished, convert the image to grayscale by going into Image - Mode - Grayscale and then saving the file (as you did in the first method above).
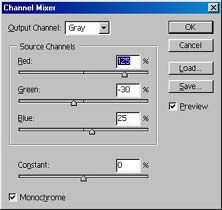
For this image of the puzzle, I wanted to punch up the Red channel and then bring the Blue channel slightly up, while bringing the Green channel down. This produces a much more vivid Black and White that almost becomes Infrared in its tone. See the images below for a comparison. And keep in mind, this is all personal taste. You have the widest degree of flexibility using this method, and you should experiment with your photos. Each image has different color qualities, and will require different settings. Here are the settings I used: R: +125 G: -30 B: +25
Step 3
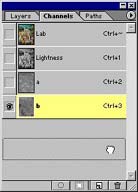
The third method is also one I prefer over a direct grayscale conversion. It brings out a more crisp tone and detail in the image that you simply cannot get with a direct RGB-Grayscale conversion. It requires a few simple steps. First convert the image to Lab color mode. Go into Image - Mode - Lab Color. This is a pretty powerful color mode that separates the image not into Red, Green, and Blue, but rather into a Lighness channel, and two Hue/Saturation Channels. Once you have converted into Lab color mode, you then need to delete the two channels (Channel A and Channel B from the Channels palette. Start by simply clicking and dragging the B channel into the trash icon.
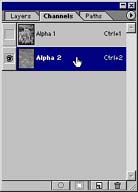
Step 4
Don't be frightened when the Channels start changing names on you. This is because deleting a channel in Lab Mode will automatically transfer your image into Multichannel mode (because it can no longer be expressed in Lab terms when a single channel is deleted). The default Multichannel mode is like a catch all for any mode not defined as one of the default color modes by Photoshop. Once you delete the B channel, the A Channel switches it's name to Alpha 2, and the lightness changes name to Alpha 1. Simply delete the Alpha 2 channel to get rid of the second Hue/Saturation channel, and you will be left with only the Lightness channel from your image. Then convert the image to Grayscale mode (as with the previous 2 methods), and save the image. This works well on Grainy images taken with high speed films, and on images that lack tone and detail. If you can't be bothered with fiddling with the Channel Mixer, then this is the method for you.
The following shows the various methods for converting from an RGB color image into a Grayscale Black & White.
Original Image |
|
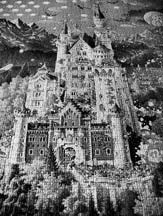 Method #1: Grayscale Conversion |
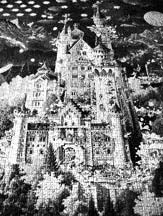 Method #2: Channel Mixer |
 Method #3: Lab Lightness Conversion |
|