Plastic Doll Face
Here is a simple tutorial that uses one of my favorite filters in Photoshop: the Diffuse filter. What strikes me about this technique is the ability to turn any face or image into melting plastic or wax sculpture. And it’s very simple to achieve this effect. Also keep in mind that you don’t need to take this effect or tutorial all the way to its conclusion. Feel free to stop at any point in the process if you find the effect is becoming too drastic.
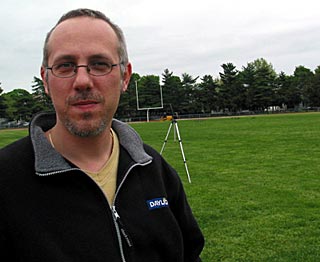
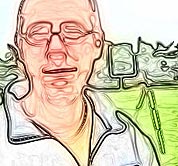
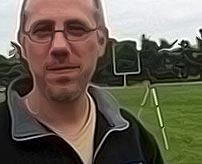
That being said, let’s open up a new image. Below I have an image of yours truly.
Step 1
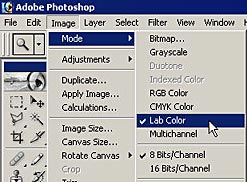
The first thing we are going to do is convert the image into Lab Color mode. If you find this option grayed out, it means you first need to pass through the RGB Color mode before jumping over to Lab Color (under the Image -> Mode submenu).
Step 2
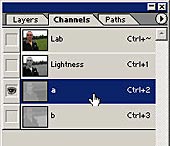
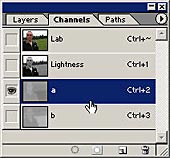
Next, go into the Channels palette and click on the "a" channel.
Step 3
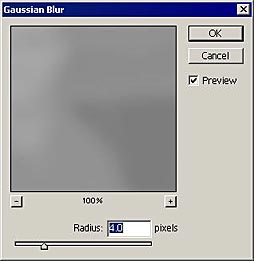
We are going to soften up this channel a little by going into Filter -> Blur -> Gaussian Blur and entering a radius of 9 pixels. When you have done this, click on the "b" channel and apply the same Gaussian Blur filter using the same settings. This has the effect of softening the colors, as all the color is held in these two channels.

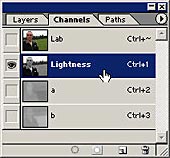
Step 4
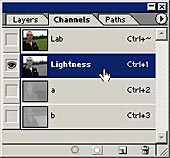
Next, select the "Lightness" channel, which contains all the tonality of the image.
Step 5
Go to Filter -> Stylize -> Diffuse, and select Anisotropic for the mode.

Step 6
Next, click on the "Lab" channel to select the entire image.
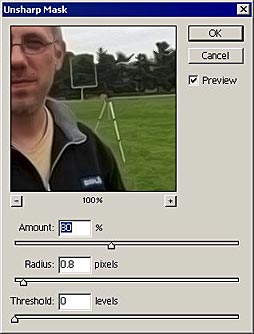
Go into Filter -> Sharpen -> Unsharp Mask. Enter the settings you see below. This has the effect of boosting the detail within the image. Alternately, you could play with a Levels adjustment layer to bring back a little more contrast and detail. The Unsharp Mask is mainly used here as a special effect.
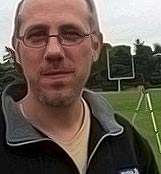
Here is our image so far. Notice how the edges are beginning to smooth out? At this point, if you don’t want to go overboard with the effect, you could stop here and leave it as is.
Step 7
Since I seldom leave well enough alone, I want to really blast out this type of effect. To do this, simply repeat the process. First, soften the color channels "a" and "b" in order to diffuse those two channels with the Gaussian Blur filter. This time, use slightly less blur (my rule of thumb is to half the amount of the effect you originally applied, so in this case we use a setting of 4 for the radius).
Step 8
Next, select the Lightness channel and apply the Diffuse filter again using the Anisotropic Mode. Note: if the effect is too much for you, immediately after applying the filter go into Edit -> Fade, and reduce the strength of the filter. I didn’t fade the filter here, and instead left it at full strength.
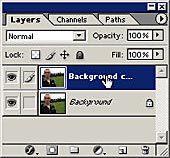
Step 9
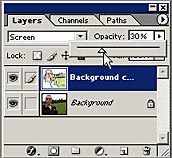
Next, I’m going to try something a little different. This time, duplicate the background layer.
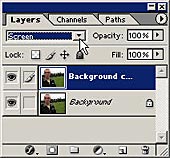
Step 10
Now set the blend mode of this new layer to "Screen" and then go to Filter -> Stylize -> Find Edges. What this does is boost the definition of the image overall. Don’t worry if it looks extremely messy. We’ll fix that in a moment.
Step 11
Change the Opacity of your Screen layer to 30%.
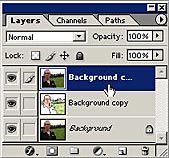
Step 12
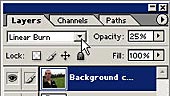
Again, make a duplicate of the background layer, and move it to the top of the layer stack. Then change the Blend Mode to Linear Burn and bring the Opacity down to 25%.
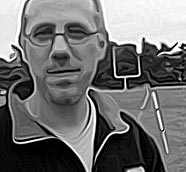
Now I’ve got one heck of a plastic face. It’s almost turned to liquid.

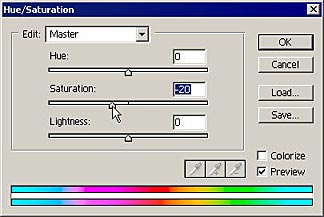
Step 13
As a final step, add a Hue/Saturation adjustment layer to the top of the Layer Stack, and bring the Saturation down to –20. This tends to slightly desaturate the vibrant colors that were introduced with the Find Edges filter.
And here is our final image, rendered in plastic (below left). Notice there is still enough detail along the edges to make out the overall shapes within the image. I really like this effect when applied to supermodels and high quality/high contrast imagery. It’s a very easy special effect that you can apply to any image to make it artistic.

I certainly hope you can find a use for this type of effect in your own projects. If you would like to download the action for this tutorial, visit my Samples page. I also created a toned down version of this action, which creates a less extreme plastic effect (shown above and to the right). Both actions can be found on my Freebies page. As always, good luck in your own photoshop pursuits.