Creating a Metal Grate
This is a bit of a new experiment for me. After writing over 50 tutorials and spending over 5 years as a Technical Writer, I thought I would try a new approach by providing a pattern recipe as opposed to a tutorial. It may look daunting at first, but don't shy away. It's really quite simple once you try it out. And I promise I'll give you a smattering of screenshots along the way for some of those hard-to-handle dialogs. So take it slow and follow along to create a Metal Grate using nothing but Photoshop as your guide. And please let me know if you like this style of tutorial by going to my Forum and letting me know. If it's something you want to see more of, then I'd be happy to put a few other ones together.
So let's get right into it shall we?
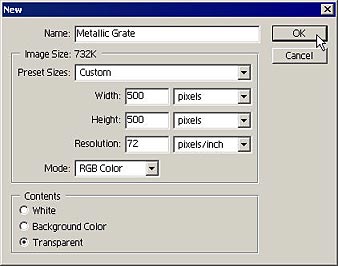
Create a New Document with the following settings (your size can be variable):
Reset Swatches to default
Filter -> Render -> Clouds
Filter -> Render -> Difference Clouds (x6)
Filter -> Pixelate -> Mosaic
Cell Size = 40 square
Filter -> Stylize -> Find Edges
Image -> Adjustments -> Levels
Channel = Composite Channel
Input = 155, 1.00, 255
Filter -> Brush Strokes -> Dark Strokes
Balance = 10
Black Intensity = 10
White Intensity = 0
Filter -> Brush Strokes -> Accented Edges
Edge Width = 11
Edge Brightness = 0
Smoothness = 1
Filter -> Brush Strokes -> Angled Strokes
Direction Balance = 100
Stroke Length = 40
Sharpness = 10
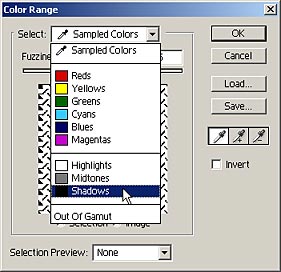
Select -> Color Range
Select = Shadows
Layer -> New -> Layer via Cut
Move the current layer (Cut Layer) to the bottom layer.
Filter -> Render -> Clouds
Image -> Adjustments -> Curves
Point (Input = 0 Output = 0)
Point (Input = 16 Output = 249)
Point (Input = 52 Output = 10)
Point (Input = 71 Output = 249)
Point (Input = 102 Output = 12)
Point (Input = 126 Output = 230)
Point (Input = 155 Output = 9)
Point (Input = 174 Output = 249)
Point (Input = 203 Output = 3)
Point (Input = 220 Output = 239)
Point (Input = 255 Output = 255)
* Save this Curve, as you will be using it after the next step — See below.

Filter -> Blur -> Motion Blur
Angle = 42 degrees
Distance = 58 pixels
Image -> Adjustments -> Curves (enter the same points as before, or, if you previously saved the curve, Load this curve now, and apply it).
Filter -> Blur -> Gaussian Blur
Radius = 4.9 pixels
Filter -> Blur -> Motion Blur
Angle = 42 degrees
Distance = 58 pixels
Select -> All
Edit -> Copy (Ctrl+C)
Select -> Save Selection. Click OK.
Go to the Channels palette and highlight the Alpha 1 channel
Edit -> Paste (Ctrl+V)
Select -> Deselect
Still within the Channels palette, highlight the RGB Channel.
Edit -> Fill
Use = 50% Gray
Mode = Normal
Opacity = 100%
Still within the Channels palette, highlight the Alpha 1 channel.
Filter -> Blur -> Motion Blur (x2)
Angle = -45 degrees
Distance = 198 pixels
Filter -> Blur -> Gaussian Blur
Radius = 8.2 pixels
Still within the Channels palette, highlight the RGB Channel again.
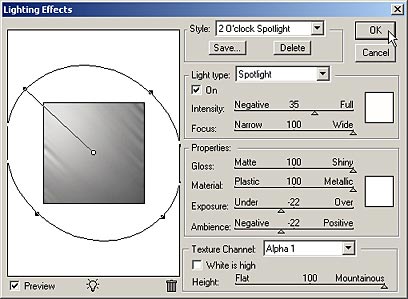
Filter -> Render -> Lighting Effects
Light Type = Spotlight
Intensity = 35
Focus = 100
Gloss = 100
Material = 100
Exposure = -22
Ambience = -22
Texture Channel = Alpha 1
Uncheck the "White is High" checkbox
Height = 100
Select Layer 1
Layer -> Layer Style -> Drop Shadow
Change Distance to 3, Size to 3, and Angle to 120 degrees (global)
Layer -> Layer Style -> Inner Shadow
Change Distance to 1, and Size to 25
Layer -> Layer Style -> Bevel and Emboss
Style = Inner Bevel, Technique = Chisel Hard, Depth = 1000, Size = 1 Highlight Mode = Screen; Opacity = 72 Shadow Mode = Multiply; Opacity = 100
Select -> All
Select -> Transform Selection (in the Options bar, click the bottom–right corner on the "Reference Point Location" grid)
Width = 92%, Height = 92%

The following shows the area that the selection should encompass. The idea is to delete the outer edges on the top and left of the image, as they are incongruous to the rest of the pattern.
When you have finished transforming the selection, press Enter/Return, or click on the Green arrow on the Options bar. This accepts the transformation.

Image -> Crop
Select -> Deselect
Layer -> Flatten Image
Image -> Adjustments -> Hue/Saturation
Check the "Colorize" checkbox
Hue = 223, Saturation = 10, Brightness = 0
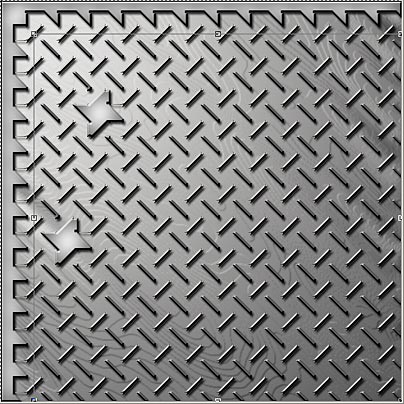
And here is the final result:
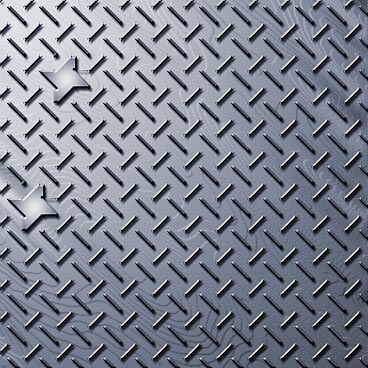
In my mind, this is the best metal grate I could come up with using only Photoshop, without any plugins. And the beauty of it all is that you can create an action out of the entire process, and use only 2 layers to do it.
Until next time, you can visit me in the ChainStyle Community, or drop me an Email to tell me what you think. Good luck in your Photoshop projects.