Creating an Oak Wood Pattern
Here is a great way to create a very realistic wood pattern. In the next few weeks I'm going to show you how to use this pattern to create a digital photo frame. This week I'm focusing on how to create the pattern that will be used within the frame itself. So have fun creating this pattern. It was a fun one to create.
Start off with a new image on a transparent layer which is about 500x500 or 1,000x1,000 pixels. The pixel size isn't that important, but be sure your resolution is 72ppi. Make sure you are on a blank layer (NOT the background layer). Once you've set up the document as outlined here, it's time to get creative! Just follow the steps below one step at a time, and you'll end up with the result at the bottom of the page.
- Set the Foreground color to Red: 141, Green: 114, and Blue: 93
- Edit -> Fill the layer with the Foreground color.
- Filter -> Noise -> Add Noise. Amount: 4.9%, Distribution: Gaussian, Check the Monochromatic checkbox.
- Filter -> Stylize -> Wind. Method: Blast, Direction: From the Left
- Filter -> Stylize -> Wind. Method: Stagger, Direction: From the Left
- Filter -> Texture -> Grain. Intensity: 30, Contrast: 0, Grain Type: Horizontal
- Duplicate the current layer by right-clicking on the layer name and selecting "Duplicate Layer"
- Change the duplicate layer’s Blend Mode to "Hard Light"
- Merge the two layers down by going into Layer -> Merge Down
- Set the Foreground color to Red: 138, Green: 92, and Blue: 56
- Set the Background color to Red: 178, Green: 152, and Blue: 119
- Click the New Layer icon on the layers Palette to create a new layer.
- Filter -> Render -> Clouds
- Duplicate the Layer
- With the duplicate layer highlighted, go to Filter -> Render -> Difference Clouds. (Do this a total of 4 times).
- Layer -> Merge Down
- Set the Blend Mode of this layer to "Screen"
- Select the bottom layer in the stacking order, and Run Filter -> Distort -> Twirl. Angle: -70 degrees.
- Select the second layer from the bottom, and duplicate this layer.
- Set the Blend Mode of this layer to "Multiply" and the opacity to 65%
- Filter -> Texture -> Grain. Intensity: 100%, Contrast: 0, Grain Type: Speckle
- Filter -> Artistic -> Dry Brush. Brush Size: 8, Brush Detail: 10, Texture: 3
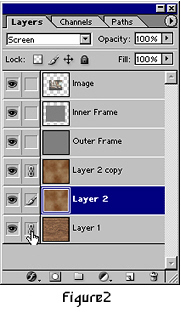
- Select the Original Clouds Layer (the layer beneath the one you are working on) — see figure 1 below.

- Filter -> Texture -> Grain. Intensity: 100%, Contrast: 0, Grain Type: Speckle
- Filter -> Artistic -> Dry Brush. Brush Size: 10, Brush Detail: 10, Texture: 3. Run this filter again, using the same settings.
- Link all 3 of the Pattern layers (the three bottom layers in the layers palette). To do this, simply click on the link icon, next to the eye icon (see figure 2 below). When done, go to Layer -> Merge Linked Layers to bring them all together into a single layer.
- Filter -> Distort -> Pinch. Amount: 50%
- Go to Image -> Rotate Canvas, and Rotate 90 degrees CounterClockwise.
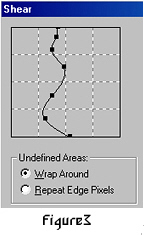
- Filter -> Distort -> Shear. Enter a few new points, and just warp the image a little (see figure 3 below). See the Shear diagram for my own settings. Be careful not to shear it too much, otherwise it looks overdone.
- Filter -> Sharpen -> Unsharp Mask. Amount: 60%, Radius: 1.2, Threshold: 0
- Filter -> Noise -> Add Noise. Amount: 2.5%, Distribution: Gaussian, Check the Monochrome checkbox.
- Finally, Go to Image -> Rotate Canvas, and Rotate 90 degrees Clockwise.
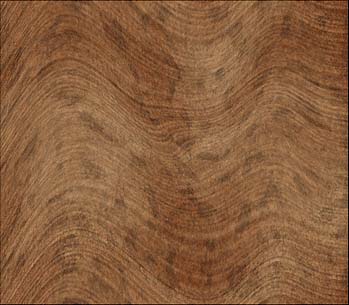
When the Pattern is built, you will have something that should look like the image below:
Until next time, you can visit me in the Forum, or drop me an Email to tell me what you think. Good luck in your Photoshop projects.