Intuitive Sharpening
Sharpening is something that you will become insanely familiar with the more you clean up your photos and images. At the heart, it is something that is usually performed on almost every image you work with in some way, shape or form. And so it pays off to know a little about how Photoshop sharpening can improve your work.
At its most basic, I would recommend a few things.
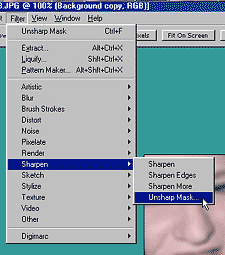
- First, never use anything except the Unsharp Mask
filter (Filter -> Sharpen -> Unsharp Mask). You can use any of the
other Sharpening tools for VERY specific purposes, but until you are thoroughly
familiar with Photoshop, don't even go there.
- Second, always perform your sharpening as the
last step in any photo restoration, or retouching project. Or any project
for that matter, as it will always change the data in your image, and
anything you do after the sharpening is performed will be inaccurate,
and a poor judgement call. Again, this is not set in stone, but is a very
good rule of thumb.
- Third, and last, always perform your sharpening on a duplicate layer of your original photo. Why? because it will change your data in your image. And this change is DESTRUCTIVE.
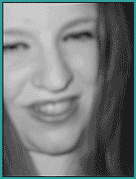
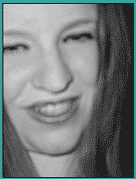
This is the image we are going to correct. As you can see it is severely blurry. Hopefully this is not what your image looks like, and hopefully yours won't need as much correction.
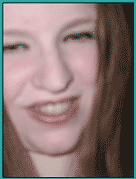
Another thing to note is that using the Unsharp Mask is not a miracle worker solution. It will help to some degree with any photo, but it cannot turn this image here into a work of art, because it is blurry beyond repair. However, it gives us a good image to illustrate how sharpening works.
So here are two methods to Sharpen your images or photos using the Unsharp Mask filter that make sense, and hence, are intuitive. This first method is geared for Color photos or images:
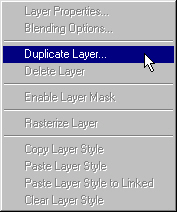
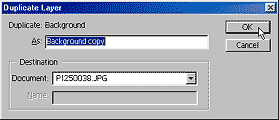
Step 1
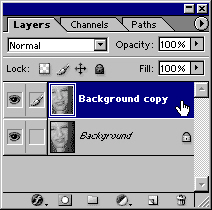
First let's start by duplicating the layer. This is done for two reasons. First, it provides a new layer for us to work on, thereby preserving the original layer underneath. No data is lost. Second, it allows us to perform blending mode functions on the top layer, providing us a smarter sharpening capability.
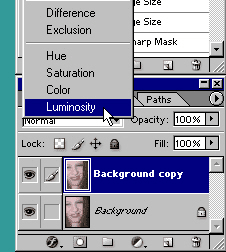
Step 2
Next, switch the top layer to Luminosity Blend Mode. This preserves the color on the layer underneath and allows you to sharpen only the lightness of the image (something you ALWAYS want to do). If you don't change the mode to Luminosity, your colors will shift, and turn into seriously ugly color cast glows around the edges of your image.
Step 3
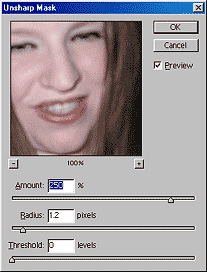
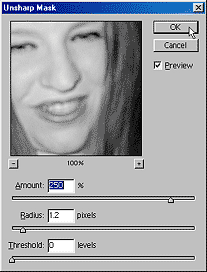
For this image, and just to show you an example, we are going to sharpen it considerably. Go into Filter -> Sharpen -> Unsharp Mask, and in the dialog enter the settings I have here. You may want to play more or less if you are using your own images. I usually always have the Threshold set to Zero, the Radius set to between 1.0-1.2 and the Amount anywhere between 50 - 300 or so. The key is in using your judgement and being able to view the preview of what your photo looks like directly in the dialog box, as well as in the image window itself.
Now let's take a look at a different method. It should be noted that this next method produces near exact results as the first method above.
Step 1
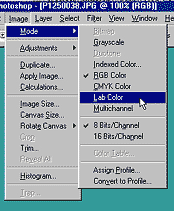
First, go into Image -> Mode -> Lab Color. You won't see anything noticeable happen to your image. However, you are working in a different color mode now.
Step 2
Next, duplicate the layer (as we did in the previous example).
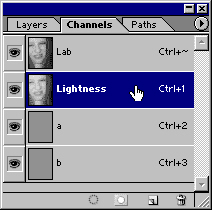
Step 3
Next, switch to the Channels palette, and highlight the Lightness channel. Be sure to have all the channels' eye icons showing. If they accidentally get turned off, just select the eye icon for the Lab layer which will turn them all on (but be sure your Lightness layer is still selected).
Step 4
Go into the Filter -> Sharpen -> Unsharp Mask filter again, and sharpen the image to your desired settings. Here I used the same settings as before.
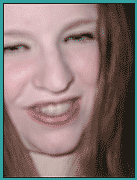
And here we have the original image along with our two sharpened copies. You may look at these and say "Hey, wait a minute. These look exactly the same", and you would be right. They are. The big difference is that if you are already in RGB mode, I would use the Luminosity Layered approach. If you are within another color mode, I would probably use the Lab mode approach, as you will be less likely to shift any colors when you switch the image over from the other mode into Lab mode (Lab color being one of the modes with the widest color gamut). In the end though, you can use both methods to achieve the same end result. And the beauty of both methods is that you still have a preserved copy of the original layer underneath. NO LOSS OF DATA! and NO COLOR SHIFTS.
As you can see, this filter is not a miracle worker. However, this demonstrates the ability to sharpen the image to some degree. Here you can see the before pictures (top) and after pictures (bottom).
Original |
 Original |
 Sharpened |
 Sharpened |