Graduated Filters
Graduated Filters are great for landscape shots or to enhance the sky when it looks as though it's going to be washed out. Generally, Graduated filters are composed of a single sheet of glass, plastic, or gel that is half color graduating to a half clear section of the glass. The result is that half your image will be filtered through a solid color. Since the transition to clear is gradual, it looks more natural within the photo. While you can have a more solidified edge between the color and clear sections of the filter, it is more common to have a softer shift. And keep in mind there are many varieties, colors, companies, and variations on graduated filters, so I'm only covering the more common ones.
Now I own a few filters and I've paid some pretty big bucks to get them. Generally, the Cokin filters are slightly cheaper, going for around $20 for an average filter. While some of the high end Singh-Ray filters go for around $150 a piece. So I thought why not try to reproduce this effect with Photoshop. Though not the same quality as using a solid glass filter at the time of shooting the original image, you can get quite comparable results post-processing the graduated filter in Photoshop. Not only that, you can also have any color at your fingertips, and save any number of colors you like. And best of all: Without the cost.
There are two sections to this tutorial. First I'm going to show you how to create the gradient in Photoshop. Second, I'm going to use the gradient to simulate a grad filter within an image. After we're done, I'll show you how Photoshop compares to the the Cokin filters I have.
One other note: I am taking as a base the Cokin filters because they are the grad filters I use. In fact, you don't have to create your own. I've created a series of the common cokin grad filters which you can purchase here. It is included as part of my Color Toolbox, and is a fraction of the cost of the real thing. They are named after the Cokin filters, and are numbered accordingly. Bear in mind that because color variations can be infinite, they are not exact matches with the Cokin filter system. They are my own filters, that were based on their system. The colors will not be exact matches. But they will save you the time and hassle of creating your own.
Step 1
To create a simple gradient that is half color and half clear (transparent in screen terms), first select the Gradient tool from the toolbox.
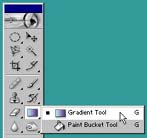
Step 2
Once this is selected, you will notice that there is an option bar below the menu bar that displays the current gradient. Double-click on this gradient bar.
Step 3
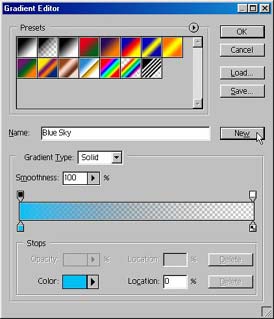
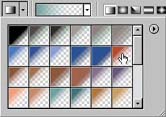
The Gradient editor dialog box opens. Assuming we are starting with the Adobe Photoshop defaults intact, the editor will display the gradients that you see here. The second gradient will be a Foreground to Transparent gradient. Let's use this to start from. Just select it by clicking once on the gradient square.
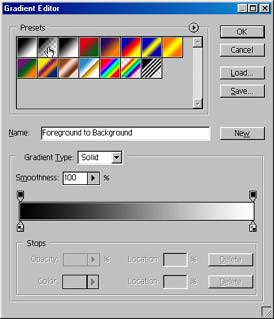
The gradient display will change and you will now see a checkerboard pattern in the bar on the right. This means that the gradient, when applied, will change to transparent. You will see 4 house-shaped boxes at all four points of the gradient display bar. The two top ones affect opacity from either side. The two bottom ones affect color of the gradient. Incidentally, these house shaped boxes are called stops, the two top being opacity stops, and the two bottom being color stops. Without going too deep into this dialog box, because it can get very confusing and takes a while to get a grip on, let's just say that you can add any number of color/opacity stops you wish.
Step 4
Since we are creating a simple color gradient, click on the first color stop (on the left).
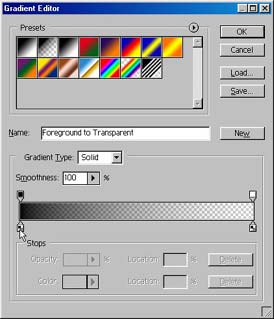
Step 5
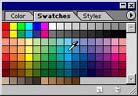
Next, select a color by hovering over your Swatches palette. You will need to have this available and at the forefront before you go into the gradient editor dialog, otherwise you will need to close your editor, bring the Swatches palette to the forefront of the application, then go back into the editor and start over. If the Swatches palette is not available, you can double-click on the Color square at the bottom of the gradient editor dialog and open the Photoshop color picker to select a color. Either way is perfectly acceptable.
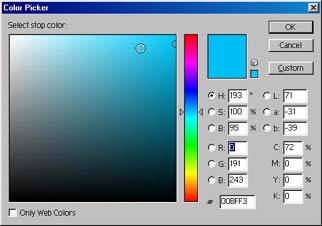
Step 6
The editor will look similar to the one below, with the color of your choice to the left side of the gradient bar. One note: you will notice that when you click on the color stop, a diamond appears in the middle of the two colors (the color on the left and the transparency stop on the right). This is your color midpoint, and it can be adjusted as well. Moving it to the left will reduce the amount of color used in the gradient, while moving it to the right will add more color. Since most true grad filters are 50/50 color and clear, we want to keep the midpoint at it's default of 50%. So just leave the diamond where it is.
Next, enter a Name for your new gradient and click on the New button.
Step 7
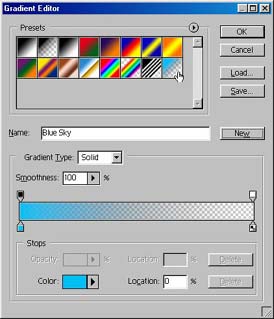
Notice that your Gradient is now added to the list. So that you don't lose the gradient, you can click on the Save button and save the gradients to a file on your hard drive. After you've done this, select the gradient by clicking on it.
Step 8
Click OK and the gradient is now selected.
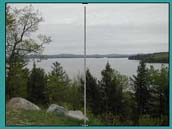
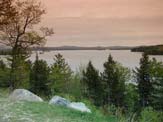
Now we are going to apply a gradient to the image and simulate a true grad filter. Don't be alarmed, as this is quite an easy process, as you'll soon find out. Start out with any image you like. A landscape photo works best and for this example I have a photo that is half and half sky and foreground.
Step 1
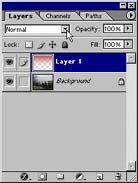
To start, from the Layers palette, create a new layer by clicking on the New Layer icon (the folding page) at the bottom of the palette.
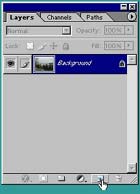
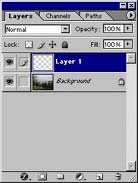
This creates a new Layer in which the gradient will be applied. Because you are putting all the grad color information on its own layer, it is completely non-destructive to your original image.
Step 2
Select the Gradient tool from the toolbox, and on the option bar that runs along the top of Photoshop, click on the dropdown arrow to the right of the gradient display bar.
Step 3
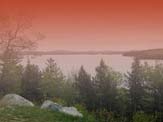
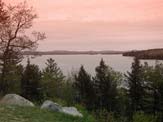
Select the Gradient you created in the first part of this tutorial, or select from any of the Gradients I've pre-built for you. For this image I want to try to simulate the Tobacco sky that the Cokin filter produces, so I'll select one of my Tobacco filters.
Step 4
Next, be sure your new layer is selected (blue) and then click and drag from the top of the image to the bottom in a straight line. If you are having trouble keeping the line straight, hold down your Shift key as you click and drag. This will constrain the line to be perfectly straight at a 90 degree angle.
Step 5
When you get to the bottom of the image, let go, and the gradient will fill over the image. Since this image is about 50% sky, and 50% foreground, and since our gradient is built to be 50% color to transparent, only the sky will be filled in. Another thing to keep in mind is that the gradient always goes from left to right in the gradient display, correspondingly from where you start to drag until you stop dragging the gradient line.
Step 6
Now go back to your Layers palette and with the gradient color layer selected, click on the Blending Mode arrow.
Step 7
From the list of options, select Color.

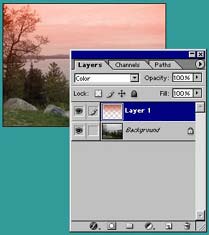
This has the effect of removing the Brightness or Luminocity from the gradient, and only applying the Color information (both Hue and Saturation). In other words, it will restore the image layer's brightness back to its original state, and as you can see here in the image above the color fades out the image. In color mode, the Image looks crisp and clear, with the color of the gradient blending in.
Step 8
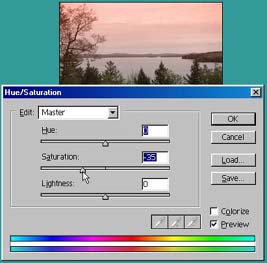
Switching the Layer's Blending Mode to Color tends to shift the color of the gradient slightly, making it seem a little weaker than the original gradient. To compensate for this, you can go into the Image - Adjustments - Hue and Saturation and adjust only the Saturation slider either to the left or to the right accordingly. This should bring back a little bit more of the gradient you lost. Or, alternatively, make it weaker if the color is too strong over the image.
The following is the final product. As I said earlier, you won't get the same results using my filters that you would with Cokin. But you can get it pretty close. The key to performing a good Graduated filter is to try to retain as much of your original image quality as is possible, while providing an nice gradual color effect. I hope you experiment with using them in Photoshop. You may not get the same quality as using a true camera filter, but as you can see here, you can get pretty close without having to spend the money.
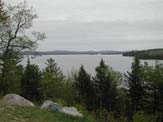 Original |
 Cokin T1 FIlter (124) |
 Photoshop Simulated Filter |
|