Vignetting
Vignetting is a very simple technique that has been used since the dawn of photography. Essentially it isolates the subject in the center of the image, while producing a gradual or sharp edged-border that either fades out into white or black (or any color you like), or else sharply transitions to the border color.
Traditionally, a vignette is circular, elliptical, or square in shape. In this tutorial I will start with one very simple method to create an elliptical or oval shape. As I write more tutorials here, I'll move on to more complex vignettes, and show variations.

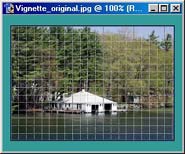
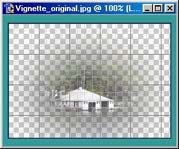
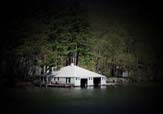
Let's Start with our original image. It's always a good idea to have the subject in the center of the photo. So here I have placed the boathouse in the middle of the image and cropped the edges.
Step 1
The first thing we need to do is select the Marquee tool, which is a dotted sqaure. If you hold down on the tool in the Toolbox, it will open up a submenu from which you can select the ellipsis (oval) dotted shape. After you select the tool, you'll notice the option bar underneath the menu changes. In the Feather field, type in a number relative to your image size. This is what gives the edge of your vignette it's softness and will tell Photoshop how far we want to stretch the edge (in pixels). If your image is very small then use a smaller Feather number. If it is relatively large, then use a larger number. To give you a point of reference, This image is 250 W x 176 H, and I am using a 30 pixel feathering.
Step 2
After you've done that, be sure to have gridlines on for a little more accuracy. Go to View - Show - Grid. That will place a grid over your image.
Step 3
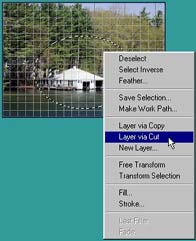
Starting with one side of the image, click and drag (from the top left) all the way down to the bottom right. I have chosen to drag from the third grid from the left edge (and 4 squares from the top) down to the bottom right (which was 3 gridsquares up and four gridsquares across from the right edge). Roughly, the circle should encompass the entire subject (in this case, the boathouse). Just be sure to leave enough outer edge in the image. In this case I have left at least two squares of image outside the ellipsis. This is necessary when we get to the step where we apply the vignette and will avoid a sharp edge.

Step 4
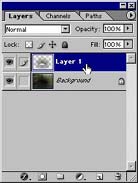
With the Marquee tool still selected, right-click anywhere within the circle, and select Layer via Cut.
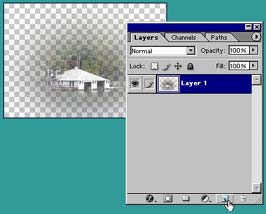
You'll notice in the Layers palette, you have created a new layer and cut the image onto it's own separate layer. Since you feathered the ellipsis, you essentially created a gradient of the edge of the image from the center outward. This is what gives it a soft edge. Though, on your image you will see no difference because both the outer and inner image layer still exist. We'll get to that next.
Step 5
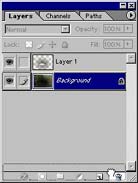
Next, Drag the Background layer to the trash icon (on the lower right corner of the Layers palette. This will delete the layer. It is the outer edge of the image and in order for us to see the vignette effect, we are removing the outer edge. Think of this as if you are cutting a circle out of a sheet of paper. Essentially the vignette is the circle in the middle. And deleting the background is like throwing away the trimmed outer part of the paper.
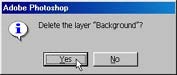
Step 6
A dialog pops up asking if you want to delete the layer. Click Yes.
Step 7
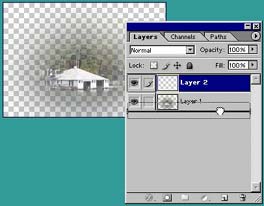
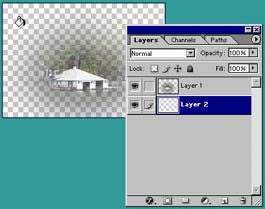
Now let's give it a better, and more defined outer edge. Keep in mind you could stop here and save the image as a transparent ".GIF" file. If you are going to put the image on the web, the transparent parts of the image will take on the color or texture of the webpage background. For our own amusement, let's give it a new layer. In the Layers palette, click on the New Layer icon (the turning page icon).
Step 8
Now, in the same Layers palette, drag the new "empty" layer below the image layer.
Step 9
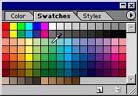
Select a foreground color (any color you like) and with the Paint Bucket tool, fill the empty layer with the color by clicking anywhere over the image. The background will turn into the color you selected. You can even use the Swatches palette if you're not sure what color you prefer. The Swatches palette contains pre-mixed colors that you can utilize quickly and easily. Just select the Paint Bucket tool, then hover over the color you want (your cursor will turn into an eyedropper which samples the color you click on, and in turn changes your foreground to that color). Very easy stuff, right?
And here you go! An example of the image with an oval Vignette effect and three different background colors: Black, White, and Light Green:


Don't limit yourself to a circle or an ellipse. Try using the square Marquee tool, or creating a custom shape with a path, in which you can select the shape, and then feather the layer cut. And play with the feather option, using more or less pixels to create a whole variety of effects. As time permits, I will write some other tutorials on the different variations to these Vignetting techniques. But for now experiment and play using this as a quick base from which you can leap into your own ideas and conclusions. Good Luck!