Creating a Photo Frame (Part 1)
This method of creating a Wood Photo Frame uses Clipping Groups, Layers, and Styles to create intricate bevels in your frame. Don’t be deterred though, it’s really easy when it gets right down to it. I like this frame method best with Wood Frames, though you can use any type of pattern or material (Metal, Plastic, Fabric) for the underlying Background. In fact, this method of creating a frame is so useful, that I use it for most of my frame actions. Because it’s flexible enough to produce not only Wood Frames, but combinations of Metal and Wood, Plastic and Fabric, and all other kinds of combinations. The possibilities are limited only by your imagination and creativity. This method is both flexible and versatile. And it’s all based on 4 simple processes: Creating the Layers, Creating the Pattern, Combining the Pattern with your Layers, and finally Adding your layer style (for the Bevels). At the end of this tutorial you will be the master of Frames, and realize how easy it is to mix and match different possibilities.
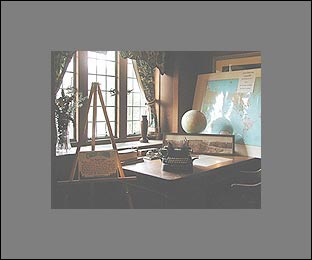
In the following example, I am going to build a Frame that will have 3 Layers and 3 bevel styles: 2 for the Wood Bevels, and one for the innermost edge where the image meets the wood.
First, open the image you want to use. If the image is sitting on the Background layer, then you will need to double-click the layer and select OK in the dialog that pops up. This converts the Background Layer to a normal unlocked layer. You do this because you need to have the ability to place layers beneath the image layer; something that cannot be done if your image is the Background.
Creating the Layers
Let’s start by creating our Layers. Within this process are four fundamental things that need to be done for each level of your frame: Sizing the Canvas, Creating the new Layer, Filling the Layer, Moving the Layer to the bottom of the Layer Stack. It’s nothing more complex than that. Since we want to incorporate 2 bevels in the wood, and a third on the image itself, then we need only 2 additional layers, so repeat the above steps twice. Let’s walk through this process slowly:
Step 1
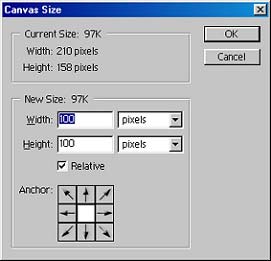
Size the Canvas. Click Edit -> Canvas Size. Be sure to size the width and height larger than your image area. This is going to be your first frame around the image. I usually use Pixels as my unit of measurement. Place a checkmark in the Relative checkbox.
Using the "Relative" Checkbox
Selecting Relative ensures that no matter how large or small your image is, your frame will always remain the same size in relation to your image. This is great for when you create actions, because it ensures the frame is a fixed size, and does not vary from image to image.
Step 2
Next, select the amount (in Pixels) that you want your first (inner) frame to be. It can be any size you like. For this example, let’s create a frame that is 50 pixels wide all the way around the image. To do this, you must enter double that amount in both the width and height fields, because the canvas will be extended on both the top and bottom / left and right sides. So enter 100 pixels for your width and 100 pixels for your height.
Step 3
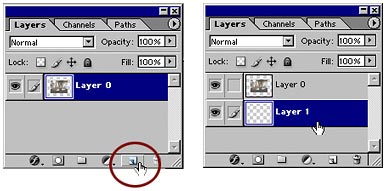
Create a New empty Layer by clicking the new layer icon at the bottom of the Layers Palette, and move this Layer to the Bottom of the Layer Stack. Just drag the layer below the image and let go.
Step 4
Fill the Layer with any color. To do this, go into Edit -> Fill and select 50% Gray, which is what I usually use. The color doesn’t’ matter here, because we will lose the color in a later step when we group the layers.
Step 5
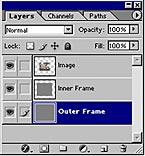
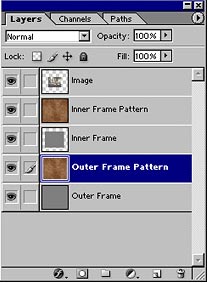
Lastly, when all these steps have been done, repeat the process as many times as you want, depending on how many levels you want for your frame. In this case we want two frame levels, so repeat the above process once more. Here is what your Layers Palette should look like when all is said and done (I’ve named the layers so you can better see what’s going on).
Creating the Wood Pattern
This is the point where you get your creative juices flowing. Up until now it’s been pretty boring, but just wait. The fun is about to happen. Before you start building your pattern inside the same image as the frame, you need to create another layer and bring it to the bottom of the stacking order. Then Alt+Click on the bottom layer’s eye icon. This will hide all the layers above, leaving only the bottom free to work on.
Choose your Favorite Pattern
If you already have a pattern or want to use a wood image, you can skip this section entirely. Just open your pre-existing pattern or image and place it into it’s own layer by copying and pasting or using the move tool to drag it from one image window to the other. When finished, move to "Combining the Pattern with your Layers".
To build the pattern directly on the new layer, the thing you have to keep in mind is that you want to keep building up the wood texture beneath all the other layers. I’ll give a wood recipe here as an example. But don’t let this stop you from exploring your own. There are literally millions of combinations you can create. This is only ONE of those combinations.
When the Pattern is built, you will have something that should look like the image below:
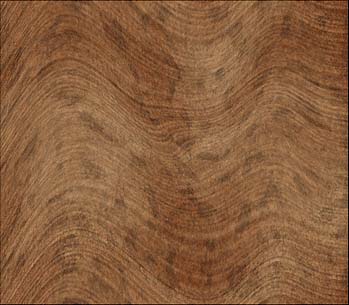
At this point, unhide all the layers by Alt+Clicking on the only visible layer (the pattern layer). By doing this, all the other layers will become visible.
Combining the Pattern with your Layers
Step 1
First, Move the pattern layer above the first (inner) frame layer. Then duplicate the pattern layer and move the duplicate layer just above the second (outer) frame layer. If you were to have more frame layers, you would need to repeat this process. The idea here is to create the same pattern layer above each frame layer.
Step 2
Next, we need to group the patterns with their respective frames. So go back to the pattern that sits just below the image and above the inner frame layer. Holding the Alt key down, hover your mouse between the pattern and it’s underlying frame layer (right on the line between the two layers) and you will see the cursor turn into a lock. When it does, click your mouse.

Step 3
Highlight the pattern that sits above the outer frame layer, and repeat step 2. If there were other frames in your image, you would need to repeat this process again.
Step 4
When all the patterns are grouped, highlight each pattern layer and select Layer –> Merge Down. This merges the patterns with their respective frame layers.
At this point, your Patterns will become visible. What you have just done by grouping is constrained the pattern to the areas of the frame below them. Anything outside the frame area (in this case the empty area of our inner frame) is clipped away — hence the term "Clipping Group").
Now I know what you’re thinking. Why would you have to clip the outer frame? Couldn’t you just use a duplicate of the pattern since there is no transparent space in the Outer Frame layer? The answer is YES. You didn’t need to go through the process of creating this outer frame layer. You could skip it entirely. But you DO need to increase the canvas size before beginning to create the pattern. I simply wanted you to get used to the process of how to build up your frame layers.